Rain Generator
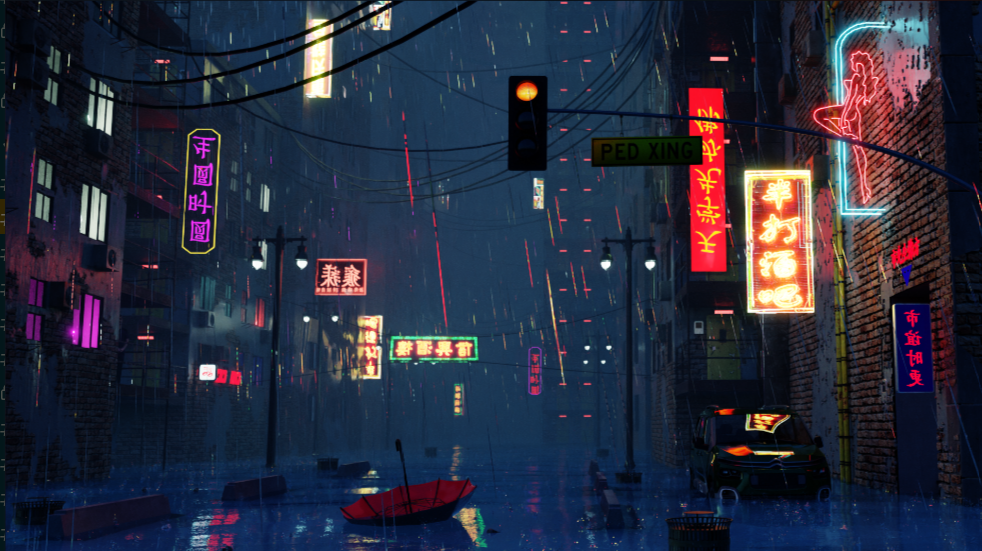
Add realistic rain to your scene with ease. Rain Generator comes with a lot of options allowing
you to tweak the rain effect exactly how you want.
Spawn Rain Generator
Rain Generator is spawned using engon Asset Browser by using the engon Panel or E key.
You can filter by Geometry Nodes filter. Get more information about
Spawning Assets.
Change the size and scale of rain
Scale of the rain object is locked. You can change the area of rain by going into Edit Mode
and editing the emitter plane shape or scale. To change the height of rain go to Rain Length
property inside Rain Generator Properties.
Change the direction of rain
You can also change the angle of the rain by selecting the Rain Object and pressing R to
rotate, the length of rain will be maintained.
Use Rain Generator with Puddle Generator
Combine puddles together with Rain Generator to achieve nice results. Read more about Puddle
Generator here.
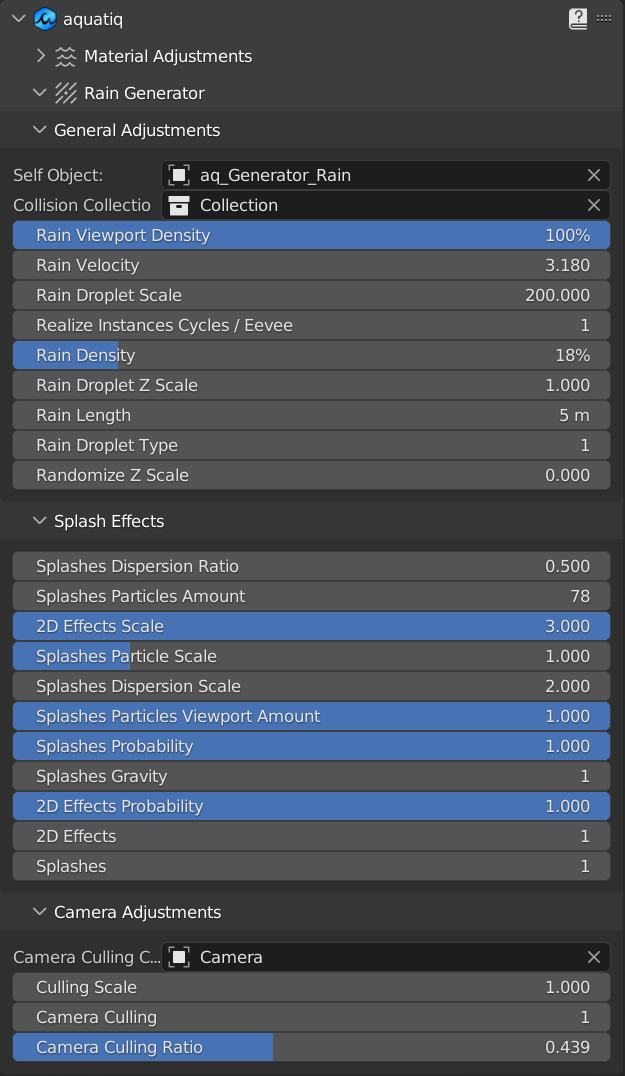
Rain Generator Properties Panel
To modify Rain Generator head over to Modifier Properties Panel in Blender. Make sure that
aq_Generator_rain object is selected. Here is a quick explanation of every feature in
Rain Generator.
Let's go through some of the features mentioned above more in depth.
General
General Properties include necessary properties for the rain generator to work correctly.
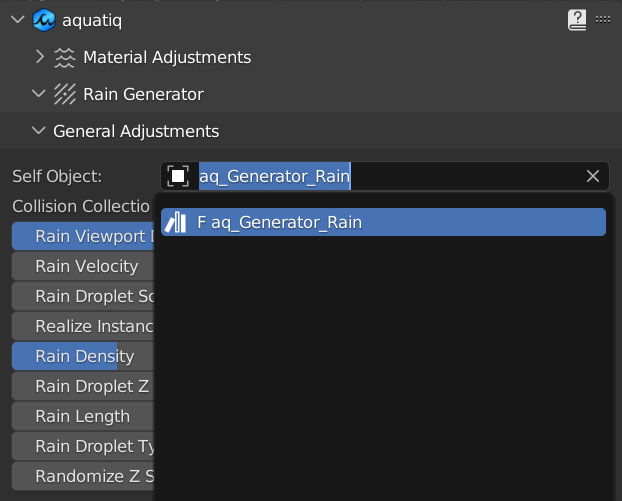
Self Object
Self Object sets the object that contains the geometry nodes modifier currently being executed.
This is automatically set to the emitter plane aq_Generator_rain.
Realize Instances
Realize Instances Cycles/Eevee is used for optimization of the Rain Generator. We use
Point Cloud Geometry Node to optimize rain. Sadly this is only available for Cycles. If you use
Eevee, enable Realize Instances by setting the value to 1. Also note that realizing instances
makes the calculations slower.
Collision Collection
Collision Collection defines a collection of objects which affect the collision point of the
Rain Generator. When a rain particle hits a collision object it terminates there. If you have
Splashes enabled it is also the point of where it will take effect.
Complex collision objects affect performance
When you use complex geometry or a large amount of objects in Collision Collection, it has
significant impact on the performance. We recommend using only objects you need for the desired
effect or using simplified geometry for the collisions.
Rain
You can modify settings related to the rain drops like their scale, type, velocity and more.
Rain Length
Rain Length controls the length of the Rain Generator in Z axis. By default the value is set
to 5 meters.
Rain Velocity
Rain Velocity modifies the speed of the rain particles. This lets you to slow down or speed up
the rain effect.
Rain Density
Rain Density changes the density of rain in percentage coverage of the emitter plane. This is the
density that will be rendered. Rain Viewport Density reduces the % of rain particles visible
in the Viewport.
Rain Droplet type
Rain Droplet Type lets you to choose from different types of rain droplets. So far we have
Rain Drops and Streaks.
Rain Droplet Scale
There are two properties affecting the scale of rain droplets. Rain Droplet Scale affects the
general scale of the droplets, allowing you to make drizzle or heavy rain. Rain Droplet Z Scale
affects only the Z scale of the droplets, allowing you to make larger streaks for example. You
can further randomize the droplets using Randomize Z scale and selecting the amount of
randomization.
Splashes
Splashes appear when the rain droplets touch objects included in
Collision Collection. Splashes enables or disables splashes. We recommend having splashes
enabled only in cases where a collision with a ground or other object with the rain effect is
visible to improve performance.
Splashes Gravity
Splashes Gravity enables or disables gravity for the splash particles. This has an effect on the
way the splashes particles behave when they come in contact with a collision object. Having
Splashes Gravity enabled makes the splashes dispersion more pronounced.
Splashes dispersion height decreases further from emitter plane.
Splashes Particles Amount
Splashes Particles Amount controls amount of particles that appear when a splash is generated.
Splashes Particles Viewport Amount reduces the amount of particles shown in the Viewport based
on Splashes Particles Amount.
Splashes Particles Scale
To change the scale of individual splash particles, make use of Splashes Particle Scale.
Splashes Probability
Splashes Probability lets you control the probability of splashes appearing upon a collision. When
set to 1, every drop of rain will generate splash.
Splashes Dispersion Ratio
Edit Splashes Dispersion Ratio to change how much the particles fly up or to the side.
Splashes Dispersion Scale changes the scale of dispersion effect.
2D Effects Properties
2D Effects add additional visual effects to the splashes. 2D Effects Probability changes the
probability of 2D effects appearing. 2D Effects Scale modifies the scale of 2D effects.
Camera Culling Properties
Camera Culling is an optimization method that, if enabled, shows Rain Generator only in a
Camera View, hiding the effect outside of Camera View. Camera Culling Ratio changes the
ratio of Camera Culling. Culling Scale changes the scale of the Camera Culling.